Whether you need to authenticate your users for PPP or any other Mikrotik service, you can do that either through the internal database or using the external RADIUS server. On the other hand, your corporate users want to use one login for all network services.
Additionally, you can connect any Mikrotik device with your Windows AD.
Let’s make the magic!
The scenario
Let’s assume that we have one Mikrotik router that will serve as your company’s VPN concentrator. This means that all company users will establish their VPN sessions through that device. That may be your main router or you can deploy another Mikrotik device in the DMZ zone.
You want to use the same username and password for the VPN as your corporate users use to log on to their computers. This is also known as Single Sign-On or SSO.
Starting with Windows 2000, Microsoft replaced their internal user database with the structure named Active Directory or AD for short. In its essence, Active Directory is the LDAP system. And yes, LDAP is the open standard for directories. However, Mikrotik devices can’t connect directly to the LDAP server.
Although your Mikrotik device doesn’t use the LDAP protocol, it is perfectly capable of using another open standard – RADIUS. The Remote Authentication Dial-In User Service protocol is described in RFC 2865.
The answer for this scenario is very simple – use the Microsoft implementation of RADIUS server and integrate your Mikrotik devices with your domain. This service exists in every Windows Server (from 2008 R2 onward) and its named Network Policy Server or NPS.
Even better, it exists even in ye olde Windows 2000 and 2003 Servers and it’s named IAS. However, those platforms are obsolete and we will not take them into further consideration.
The recipe
In an essence, we need:
- At least one working AD server (a.k.a. the domain controller)
- Your users already can log on to this domain and work regularly with other network services, like file servers
- At least one server in that domain must have a NPS role
- Your Mikrotik device must be properly configured for other network roles and accessible from your local network and the Internet
Please, note the following information:
- all LAN IP addresses of all devices you will use
- the short domain name (like Contoso)
- all user groups in that domain that will use this service
- check your password policies for communication between devices
When all those steps are fulfilled, we can continue with this process.
Install the NPS role on the server
The first step is to install the NPS role on one of your servers. You may have more than one NPS server in your network. Later, you will see that one Mikrotik device may use more than one RADIUS server. In my scenario, I will use one Mikrotik device and one NPS server.
This process it the same regardless of the version of Windows Server. I found those screenshots in my archive and I luckily made them 5-6 years ago when I configured NPS for the first time. When I upgraded that server to 2012R2, I used them to repeat this process smoothly.
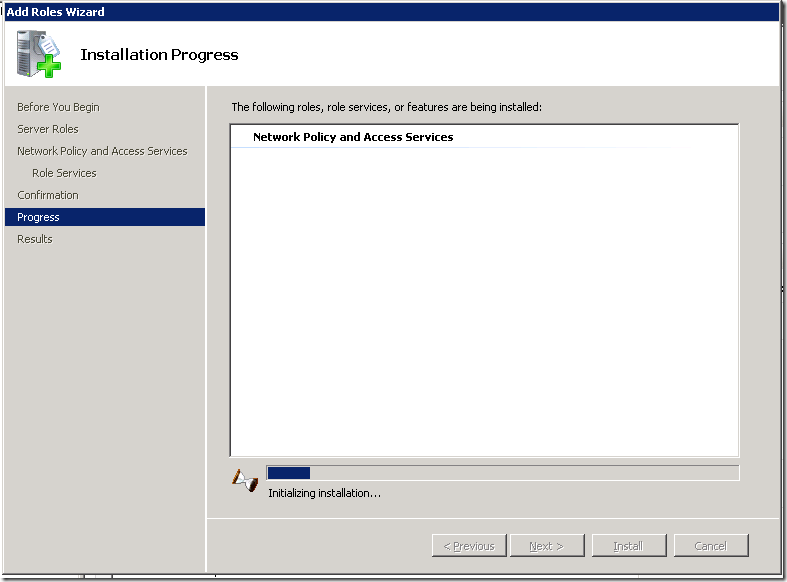
Open the Server Manager GUI on your server and add new role – Network Policy and Access Services.
You need to select only the Network Policy Server role. In Windows Server 2012R2, you will not see the Routing and Remote Access Services option here. Don’t worry, you don’t need it at all.
Finish the installation process.
It will take a while, so grab a coffee and prepare for the next step.
Configuration of the NPS service
Open the Network Policy server console from the Administrative Tools.
When the console opens, you can start to configure it. Choose RADIUS server for Dial-Up or VPN Connections from the dropdown menu.
Then click on the button named Configure NAP. We are just starting the configuration process.
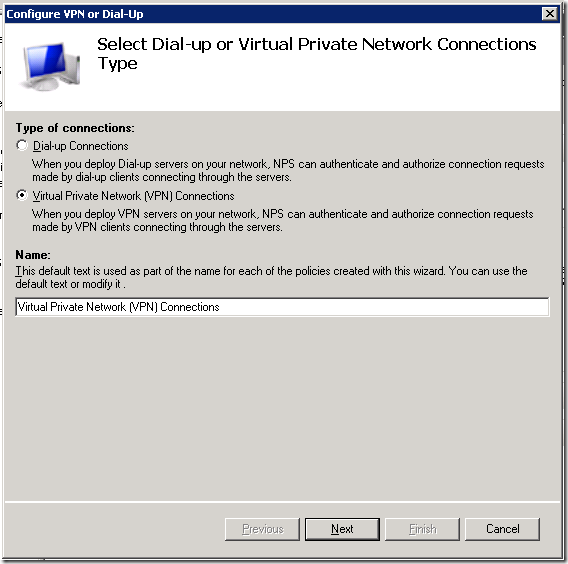
The next step is to name it and choose the type. We need the policy for VPN connections.
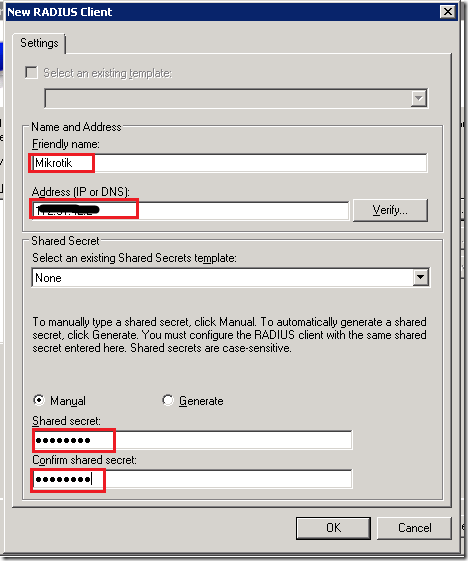
Now, we need to add all RADIUS clients that will use this policy. Yes, you may have more than one client related to the same policy.
Click on the button [ Add… ] and the new dialog will pop up. You need to define:
- a friendly name for that device (like Mikrotik router)
- specify its IP address (or DNS name)
- enter the RADIUS secret – a password that will be used later in communication
This RADIUS secret is important and therefore write it down. You must enter it correctly later on your Mikrotik device. As you already concluded, you may use the different secrets for different clients.
Repeat this process for all clients you want to configure here. When you finish, just continue to the next step.
We should choose the authentication method.
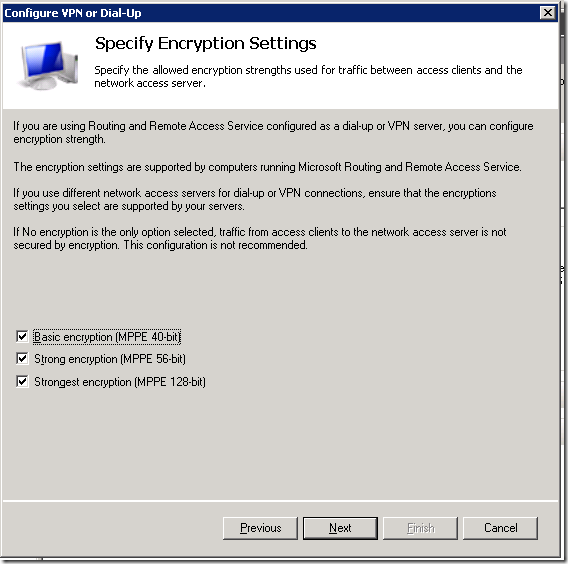
I left this on MS-CHAPv2 protocol. It is not important here, as it’s related to Microsoft Windows based services.
The next step is to add users that will be processed with this policy. This dialog is very similar to that related to the network clients. This is a very important step.
Again, click on the button [ Add… ] and the new dialog will pop up. This is the standard dialog to select users or groups that you can see anywhere in Windows.
Choose all the groups you want to include. As this policy will cover all users in the domain and all users are always the part of group named Domain Users, I added only this one group here. Again, when you finish adding all necessary group, go to the next step – the IP filters.
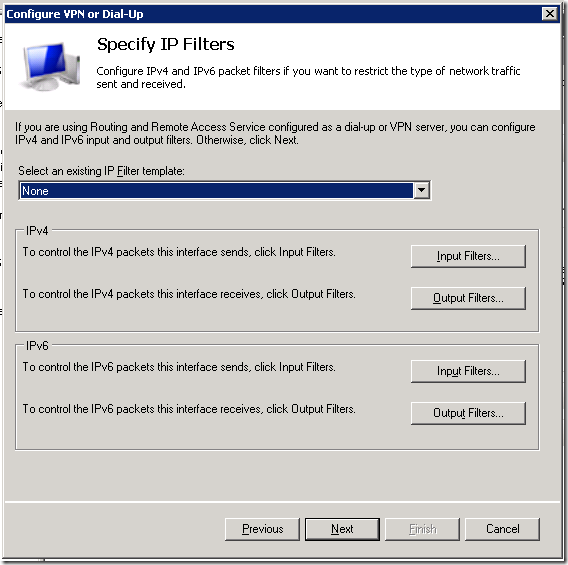
Just leave it on None and continue.
Those settings are also not important for this policy as they are only Microsoft related. Just continue further.
You don’t need to use the REALM name so leave it blank. In case you want to use it, you need to specify it later in Mikrotik.
And that’s it. We have our new policy that will process all VPN logins from our Mikrotik router.
Check your new policy
Before we switch on the Mikrotik side, we will check our setup on the NPS side. This is also a good way to do the troubleshooting steps.
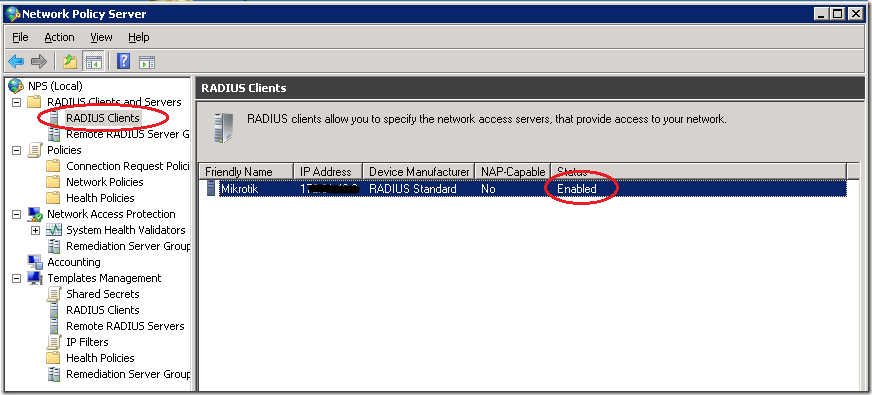
The first step is the RADIUS Clients list – your device must be enlisted and enabled
The second step is to check the Connection Request Policies – the VPN policy must be enabled.
The third step is to check the Network policies – the policy for VPN connections must be enabled
Now, we are ready to configure our Mikrotik device.
Configuring our Mikrotik device as the RADIUS client
We know that our NPS server works and we can configure the client side. In this scenario, I will enable the RADIUS authentication for PPP services. I used WinBox here, but you can do the same using the terminal.
Preparing the PPP service for RADIUS
I opened the PPP options in WinBox and then chose the tab named Secrets. On this tab, I clicked on the button named PPP Authentication & Accounting.
The new dialog opened and I checked the option named Use Radius
I closed this dialog and the PPP settings. Now, all my PPP services may use the RADIUS service. Keep in mind that Mikrotik can simultaneously use both the local user database and the remote RADIUS server for the user authentication.
Configuring the RADIUS client
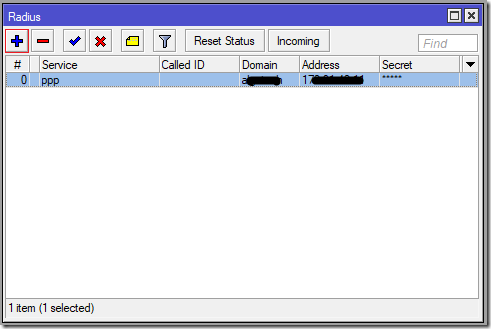
The RADIUS client is hidden behind the command named RADIUS in the main menu of the WinBox GUI.
The new window will open and here we can see all configured RADIUS clients. As I already mentioned, we can use more than one RADIUS server with the same Mikrotik device.
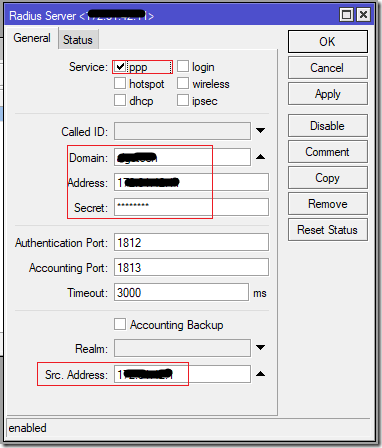
If you need to define the new RADIUS server connection, click on the button [ + ] or just double-click on the existing definition to edit it. Now we can configure our connection.
We need to specify:
- the service (ppp in this scenario)
- the Windows AD Domain name (like Contoso)
- the IP address of NPS server
- the RADIUS secret – the same password we defined in the NPS policy
- the source address of our device – this IP address must match the IP address we have already specified in the NPS policy
When you configure all those parameters, click on the button [ OK ] to save them. Now you can test your VPN connections.
If you want to see the statistics, you can open this RADIUS connection and choose the tab named Status, where you can see the parameters of the communication.
You should see that most of your requests are accepted.
And the RADIUS server served well for many years
This was my story about this interesting integration. Again, there was a bit of magic that makes great things.
By the time you finish read this, my server will be upgraded to Windows Server 2016 and I used this same magic to transfer NPS on it. This service may finish more tasks but I used it only for this purpose.
As you can see, both sides are very flexible to configure. You may add more client devices or more servers, according to your needs. Even more, you can configure additional RADIUS servers for other Mikrotik network services, like hotspot.
Stay tuned.












I have configure windows server 2022 as local domain controller and as well Configuration of the NPS service. user goes connect with same username and password with domain controller via mikrotik router vpn l2tp server successfully. but domain client map data drive goes offline.
LikeLike
OK, let’s try to debug it… According to your description, I will assume that you have small network with the single server with multiple roles.
Now, can you please provide me with the following information:
– Can you ping your server from the VPN client?
– Where is your DHCP server for the VPN clients?
– Are you using the same or the different scopes of the IP addresses?
– Do you have the default gateway on your server?
Maybe one of those questions will solve the problem, yet let’s see. Waiting for your response.
Cheers,
Srdjan
LikeLike
Hello Srdjan, good morning !
I’ve had a problem with one of my VPN clients. I have configured access through a Mikrotik and RADIUS and with NPS in Windows Server 2012. The rest of the users can connect well to AD from VPN. But only this one suddenly, after working for two years, has begun to receive a message that says
“Error 789 : The L2TP connection attempt failed because the security layer encountered a processing error during initial negotiations with the remote computer”
I have installed Windows 10 updates up to Ver 21H2 as another client with the same version on the same remote network works correctly for the same VPN connection, but I can’t make it work.
At the client I’ve removed the VPN settings, Mini WAN devices, and I’m still unable to connect with the same message.
I suspect that the connection does not even get started, since in the Mikrotik the Log does not register any message like the NPS.
Would you have any suggestions to make me and review something else?
Thank You !
LikeLike
Hi Jorge, good afternoon!
Yes, one of that weird situations.
Now, I can’t say for sure, but it’s highly probably that the local computer actually has a problem. When I had the similar problems with my own laptop, I done the following:
– restart computer (least likely to solve this problem)
– check the Event log (with special focus on system and application logs)
– go to Device Manager and remove all network adapters, not just all WAN mini port interfaces
– reboot computer after that step
– try to connect
– is that VM or physical computer? VM can have a problem with virtual NIC (check out this article https://mivilisnet.wordpress.com/2020/07/24/a-windows-vpn-connection-failed-from-the-virtualbox-vm/)
– try to clear sign-in credentials (that will require from user to type them again on the first connection attempt)
– check another VPN tunnel type, like PPTP, just to check connectivity and to clear any doubts if the problem is related to that machine
Although you said that you’re recreated VPN, you can also try to delete it, reboot machine, use tool like CCleaner to clean Registry and to create VPN again
Hope that any of those steps will be fruitful.
Best regards,
Srdjan
LikeLike
Hi Srdjan, thank you very much for your prompt response.
It is a Physical Machine Lenovo E490 i5 8thGen.
I’ve tried your recommendations, but none of that worked. Update drivers, BIOS, Firmware, remove network devices and VPNs, CCleaner, etc., but I can’t connect it to the AD through the VPN.
Nor to other different VPN tunnels. In Mikrotik’s log I could see that it records “Phase 1 negotiation (Identity Protection) <=> ” but then it falls by time up.
maybe you need to reinstall the OS?
LikeLike
Hi Jorge,
I just had the support call from one of my coworkers from the technical team and the problem was solved with uninstallation of those WAN mini port network adapters.
When you look on it, that’s looks like the Windows bug indeed. I’m so surprised with those VPN problems, as that’s the basic feature virtually needed by anyone today…
Best regards,
Srdjan
LikeLike
I finally found the error!!
The KB5009543 update that Microsoft released in January-11 affects VPN connections.
Uninstall that update and it’s up and running.
This is the link where I found it: https://news.softpedia.com/news/microsoft-confirms-vpn-bug-caused-by-windows-cumulative-update-kb5009543-534686.shtml
en este forum tambien lei que sobre este inconveniente.; https://community.meraki.com/t5/Security-SD-WAN/Client-VPN-Error-After-January-Windows-Updates/m-p/137098#M34398
Thank you very much Srdjan!! cheers !
LikeLike
Thanks very much for your response Jorge! That’s the great news indeed
This is such valuable contribution to this article! Great work nonetheless
Cheers,
Srdjan
LikeLike
Addendum: I tried the latest Windows update by myself and I can confirm that only L2TP is affected, yet SSTP will work fine.
The named update can be removed with the WUSA command.
Srdjan
LikeLike
Hi! in Windows 11 removing KB5009566 Update, fix the error too.
Thank you Srdjan !
LikeLike
Well, when you look on it, Windows 11 is actually Windows 10 with the new look and that requirement for the bloody TPM chip 😉
Stay cool!
LikeLike
https://docs.microsoft.com/en-us/answers/questions/691993/can39t-connect-to-any-vpn-after-today39s-windows-u.html solution for windows10. it happen to me. just remove KB5009543.
LikeLike
Hi,
I tested that update by myself and I can confirm that only L2TP/IPSec VPN is affected. SSTP works fine
LikeLike
Good morning,
Windows Server 2019
the radius works perfectly, however I have authentication failed to the authentication domain to the active directory,
Reason Code 49
I use mschap authentication, but also in chap I have the same problem.
How can I fix it?
thank you in advance
LikeLike
Good afternoon,
Sorry for delayed answer.
Well, not sure on top of my head, but try to play with policy. Try to omit the user group or device type.
Hope that this will help.
BR,
Srdjan
LikeLike
[…] How to integrate your Mikrotik router with Windows AD … […]
LikeLike
Reblogged this on About me and the world.
LikeLike
Hello good morning, I am looking for a way to control internet access by users.
It’s possible?
For example I have 2 users in the windows server 2012 R2 AD, Juan and Pedro.
User Juan logs on to a PC and has access to everything
User Pedro starts session on a pc and has restricted access ?.
Only using the AD user names, without taking into account the IPs or MACs from which they are connecting?
Any suggestions are welcome, thank you.
LikeLike
Hi & good afternoon!
Yes, you can use the Hotspot feature on any MikroTik device. It can control the Internet access.
I didn’t try to use it with AD. In my case, I used the local user database. Nonetheless, it can be connected in the same way as I done for the PPP services. After that, every user will be authenticated on AD.
Well, I have some materials about Hotspot and definitely I should write the series on the subject.
Hope this will help!
BR,
Srdjan
LikeLike
Hola buenos dias, estoy buscando una forma de controlar el acceso a internet por medio de los usuarios, me perdi un poco con esa parte, es posible?, que por ejemplo tengo 2 usuarios en el AD de windows server 2012 R2, Juan y Pedro, el usuario juan inicia sesion en una pc y tenga acceso a todo y el usuario Pedro cuando inicie sesion tenga acceso restringido? solo usando los nombres de usuario del AD, sin tener en cuenta las ip o las MAC desde las que se estan conectando?, cualquier sugerencia es bienvenida, gracias.
LikeLike
Hi,
Great article!
What if I want to authenticate some users for Winbox login and other users to hotspot?
How could we do that without making a mess in permissions, and get in trouble with hotspot users logging in the server?
LikeLike
Hi,
Thanks!
You can enable Hotspot authentication very simple. In the RADIUS client check the option hotspot and it will forward login request to your NPS.
You can use RADIUS also for WinBox (router) access. You can configure AAA inside System>Users. However, I will strongly discourage such practice. From the security standpoint, you should have the separated accounts for the workstation login, server login, AD administration, device administration, etc.
Every local MikroTik service will contact the RADIUS client service and that service will forward login request further. It will not make confusion between requests. However, you can configure the separate RADIUS clients for every service. This is possible.
LikeLike
Windows 2016 Server Standard
RouterOS 6.48
Hi have error ..user xxx.xxx.com authentication failed – radius time out
LikeLike
Hi,
Did you check my post related to Windows Server 2016 and problems with NPS? Here’s the link https://mivilisnet.wordpress.com/2019/02/01/when-mikrotik-vpn-with-nps-authentication-stops-working/
Now, from the top of my head, you should check:
1. the network connectivity between the router and the server
2. your NPS policy
3. the dial-in permission in the user settings
4. your users should send DOMAIN\USERNAME in VPN
5. if you edited your NPS policy it will stop working. Delete it and create it from scratch
6. the router’s RADIUS client parameters
Hope this will help.
Cheers,
Srdjan
LikeLike
i have followed your step . Users>Properties>Dial-in >remain Allow access and i just uncheck Ignore user account dial-in properties . It’s works!. Thank you Srdjan.
LikeLike